Simon has told me that I MUST blog what I just cooked for dinner, so that I can create it again. He didn't stop raving while he ate it, and then proceeded to slurp (yes slurp) the sauce off his plate with the odd glance at the neighbours house to check that I was the only one who saw. Although I was actively not looking and frankly I don't think he'd have cared if the neighbours did see! Either way, I'll take it as high praise and a seal of approval on what I thought was a quick easy meal.
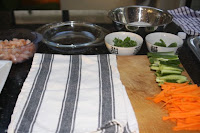
Prepare everything before you start cooking anything. I used 8
separate bowls in the preparation! Admittedly they were all little rice bowls or smaller, so not as bigger deal as it sounds.
Thinly slice
2 cloves garlic.
Cut a thumb size piece of
ginger into thin matchsticks. (Keep the ginger and garlic
separate for now - they need to be cooked
separately - seriously!)
Cube half a mammoth
breast of chicken (I don't know what our grocer does to his chickens, but I think they genuinely have been crossed with a mammoth)
Squirt some
honey and
soy sauce over the chicken.
Cut the ends off a couple of heads of
bok choy or similar (because I HATE having to cram a whole
bok choy plant in my mouth - the leaves are fine, but not the the whole damn tree!)
Grab the left over
broccoli (which I can never spell) out of the fridge and cut into small mouth size chunks.
Thinly diagonally slice
a carrot or 2 - put in the same bowl as the
broc.
Thinly slice a couple of
courgettes on the diagonal.
Quarter or a halve a handful of
mushrooms (depending on the size).
Thinly slice, end to end, about 1
capsicum - I used half a red and about a quarter of an orange one.
Ok, is that it?
Hmm, prepare 2 cups of
Chicken stock - but bear in mind you only used 50 ml this time, so maybe 100ml prepared would be sufficient!
Also required on the bench -
soy sauce,
Hoisin sauce,
arrow root,
oil. Wok on the gas element, both a slotted (or net) spoon and my favourite wok turner
thingamy-
doofer.
Ok, wok on, add a generous amount of
vege oil. Before it smokes (in theory), add the garlic, this will take less than 1 minute to cook - remove with the slotted spoon, drain on a paper towel. Do the same with the ginger - they can now both be put in the same bowl for use later.
Now you should have quite a bit of oil in the wok - add the chicken and keep it moving until cooked through. Drain and remove to a bowl.
Now
there is a brown soy-
ey, honey-
ey, oily puddle in the wok. Begin adding the veges in the order of slowest cooker to quickest cooker -
brocolli (spelt differently!) and carrot first, then capsicum & courgette fairly close together, finally
bok choy and mushrooms.
Throw a teaspoon of
hoisin sauce over the chicken.
If the veges are taking too long (I'm a notoriously impatient cook), add a dollop of chicken stock to the pan to encourage more steaming!
Before adding the chicken back in, and once veges are suitably cooked (I like mine still a
little crunchy), check the amount of liquid in the wok, keep it boiling and add up to 2 teaspoons of arrowroot mixed with a little of the chicken stock. Mix quickly. Yes, quickly - arrowroot
goos up really fast if you're not careful!
Reintroduce the chicken to the pan and tell it to play nicely with the veges. Discover you didn't drain it so well and there's more juice in the pan again - no worries, it made a great sauce. Squirt over some soy sauce (because it was lacking a
little bit of saltiness at this point), stir loads - like, don't stop, just keep stir-frying until everything is well mixed and the chicken heated through.
Serve and DO NOT forget to evenly
sprinkle the ginger and garlic over each serve.
Apparently this was absolutely delicious and Simon would go back to a restaurant to have it again and would happily pay $30 for it. Nice.